The NetBeans (also known as Apache Netbeans) is an open-source and award-winning IDE (integrated development environment) application for Windows, Linux, Solaris, and Mac. The NetBeans IDE provides a much powerful Java application framework platform that allows programmers to easily develop Java-based web applications, mobile applications, and desktops. It is one of the best IDEs for C/C++ programming, and also it provides vital tools for PHP programmers.
The IDE is the only first editor, that provides support for many languages like PHP, C/C++, XML, HTML, Groovy, Grails, Ajax, Javadoc, JavaFX, and JSP, Ruby, and Ruby on Rails.
The editor is feature-rich and provides an extensive range of tools, templates, and samples; and it’s highly extensible using community developed plugins, thus making it well suited for software development.
NetBeans Tools and Capabilities
Netbeans IDE ships with the following features that take your application development to a whole new level.
- A drag and drop GUI design tool for rapid UI development.
- A feature-rich code editor with code templates & refactoring tools.
- Integration tools such as GIT and mercurial.
- Support for the latest Java technologies.
- A rich set of community plugins.
In this article, we will show you different ways that you can use to install Apache NetBeans in Debian, Ubuntu and Linux Mint distributions. By the time of penning down this article, the latest release is Apache NetBeans 12 LTS.
On this page:
Requirements:
- A Desktop machine with a minimum of 2GB of RAM.
- The Java SE Development Kit (JDK) 8, 11 or 14 is required to install NetBeans IDE (NetBeans does not run on JDK9).
Read Also: How to Install NetBeans IDE in CentOS, RHEL, and Fedora
How to Install Latest NetBeans IDE On Ubuntu, Mint & Debian
1. To install the most recent stable version of NetBeans IDE 12, first, you need to install Java JDK from the default repositories as shown.
$ sudo apt update
$ sudo apt install default-jdk
Next, verify the Java JDK version.
$ java -version
3. Now open a browser, navigate to NetBeans IDE download page and download the latest NetBeans IDE installer script (Apache-NetBeans-12.0-bin-linux-x64.sh) for your installed Linux distribution.
Alternatively, you can also download NetBeans IDE installer script in your system via wget utility, by issuing the below command.
$ wget -c https://downloads.apache.org/netbeans/netbeans/12.0/Apache-NetBeans-12.0-bin-linux-x64.sh
4. After the download completes, navigate to the directory where the NetBeans IDE installer has been downloaded and issue the below command to make the installer script executable and start installing it.
$ chmod +x Apache-NetBeans-12.0-bin-linux-x64.sh
$ ./Apache-NetBeans-12.0-bin-linux-x64.sh
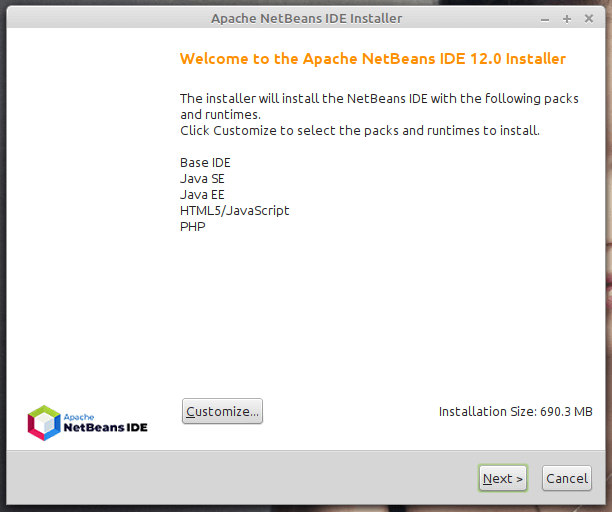
5. After running the installer script above, the installer “Welcome page” will show up as follows, click Next to continue (or customize your installation by clicking on Customize) to follow the installation wizard.
6. Then read and accept the terms in the license agreement, and click on Next to continue.
7. Next, select the NetBeans IDE 12.0 installation folder from the following interface, then click Next to continue.
8. Next, enable auto-updates for installed plugins via the checkbox in the following screen which shows the installation summary, and click Install to install the NetBeans IDE and runtimes.
9. When the installation is complete, click on Finish and restart the machine to enjoy NetBeans IDE.
And voila! The dashboard will come into view and you can start creating a project and building your applications.
How to Install NetBeans Using Snap On Ubuntu, Mint & Debian
Installing NetBeans using a snap package manager is the most recommended way because you get to install the latest version of software packages.
To get started, update your system’s package list by running the following command:
$ sudo apt update
To install Netbeans using the snap package manager, execute the command below. This downloads the NetBeans snap on your system.
$ sudo snap install netbeans --classic
Upon successful installation, you will get a confirmation that Apache NetBeans has been successfully installed.
Once installed, use the application manager to search for Netbeans as shown below. Click on the icon to launch it.
How to Install NetBeans Using APT On Ubuntu, Mint & Debian
An alternative option to using snap is using the good old APT package manager which is native across all Debian-based distributions. However, this does not install the latest version of NetBeans. As discussed earlier, Netbeans installer and snap is the recommended option if you desire to install the latest version.
Nevertheless, run the following command to install Netbeans:
$ sudo apt install netbeans
This downloads a whole bunch of packages including JDK, Java interpreter and compiler, and many other associated dependencies. When the installation is complete, again, locate NetBeans using the application manager and launch it.
Congratulations! You’ve successfully installed the latest version of NetBeans IDE 12 in your Debian/Ubuntu and Mint Linux based systems. If you have queries use the comment form below to ask any questions or share your thoughts with us.
