Logo
  • Ubuntu
  • CentOS
  • Debian
  • Fedora
  • RedHat

How to Share Wired Internet Via Wi-Fi and Vice Versa on Linux - DesignLinux

May 29 2020
designlinux 0 Comments

In this article, you will learn how to share a wired (Ethernet) internet connection via a wireless hotspot and also how to share a wireless internet connection via a wired connection on a Linux desktop.

This article requires you to have at least two computers: a Linux desktop/laptop with a wireless card and an Ethernet port, then another computer (which may not necessarily be running Linux) with either a wireless card and/or an Ethernet port.

Sharing Wired(Ethernet) Internet Connection Via Wi-Fi Hotspot

First, connect your computer to a source of internet using an Ethernet cable as shown in the following screenshot.

Connect Ethernet Cable

Connect Ethernet Cable

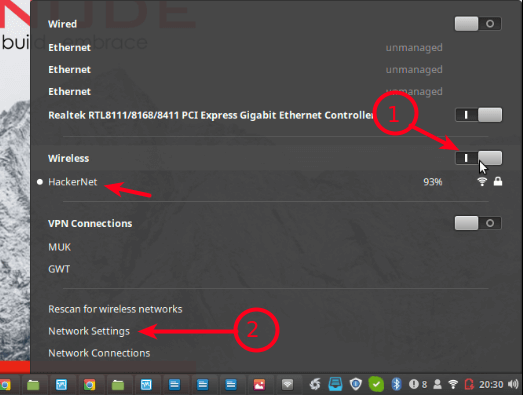
Next, enable Wireless connections, then go to Network Settings as highlighted in the following screenshot.

Enable Wireless Connection

Enable Wireless Connection

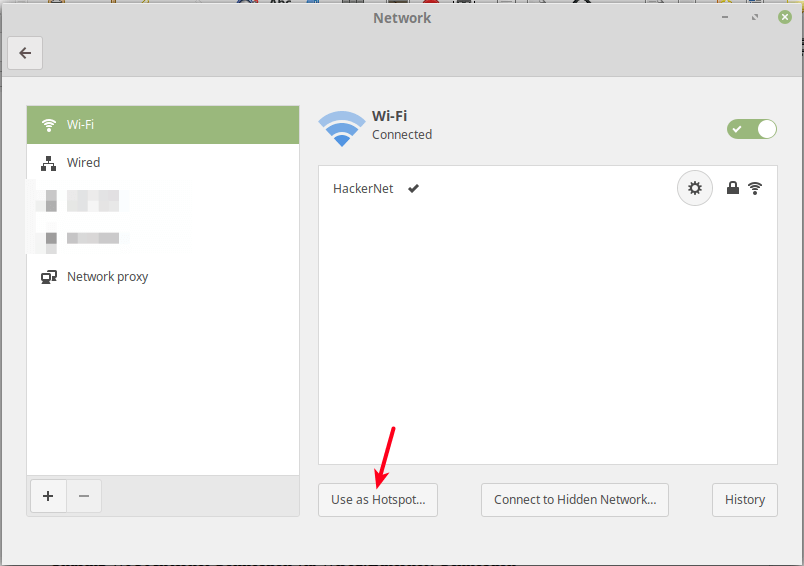
Then click Use as Hotspot as shown in the following screenshot.

Use as Hotspot Feature

Use as Hotspot Feature

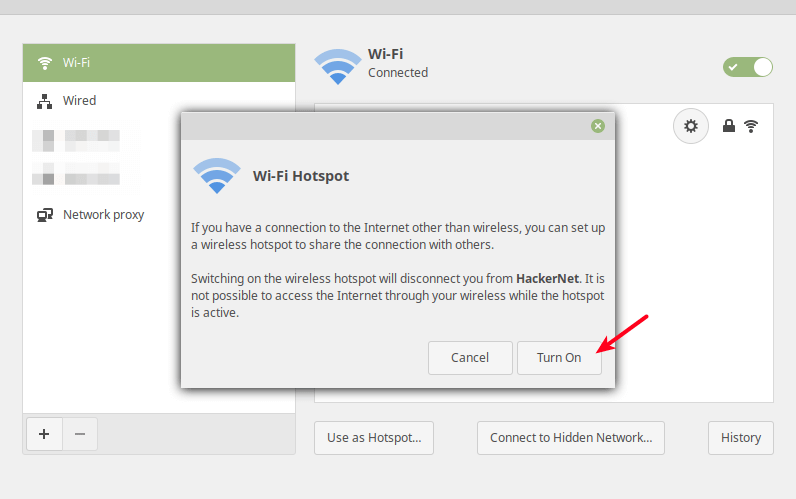
Next, from the pop-up window, click Turn On to activate the wireless hotspot.

Turn On Hotspot

Turn On Hotspot

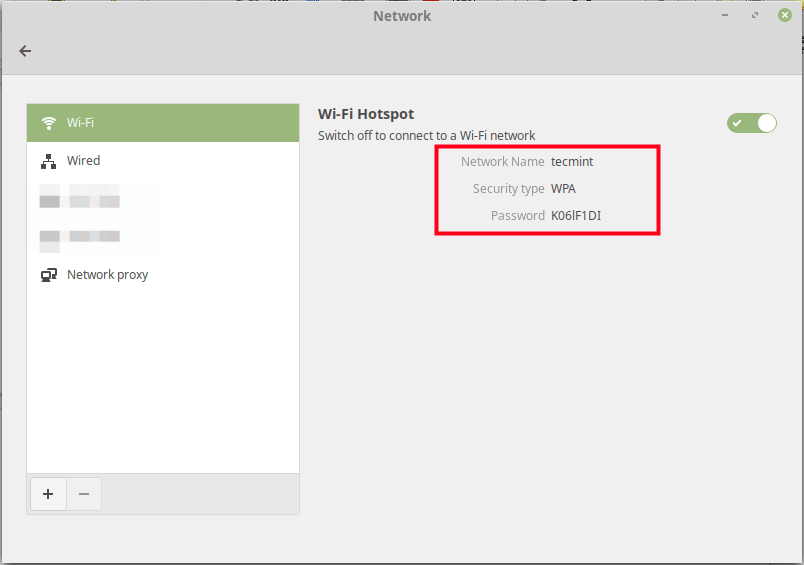
Now a wireless hotspot should be created with a name defaulting to the hostname e.g tecmint.

Wireless Hotspot Created

Wireless Hotspot Created

Now you can connect another computer or device via the hot-spot to the internet.

Sharing Wi-Fi Internet Connection via Wired(Ethernet) Connection

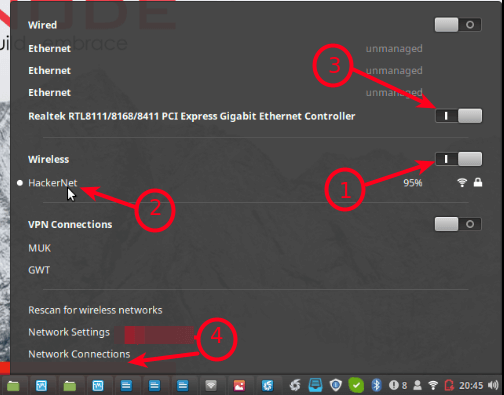
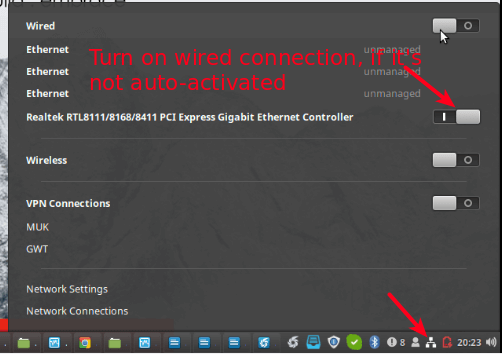
Start by connecting your computer to a wireless connection with access to the internet e.g HackerNet in the test environment. Then connect an Ethernet cable to it and go to Network Connections.

Connect to Wireless and Enable Ethernet

Connect to Wireless and Enable Ethernet

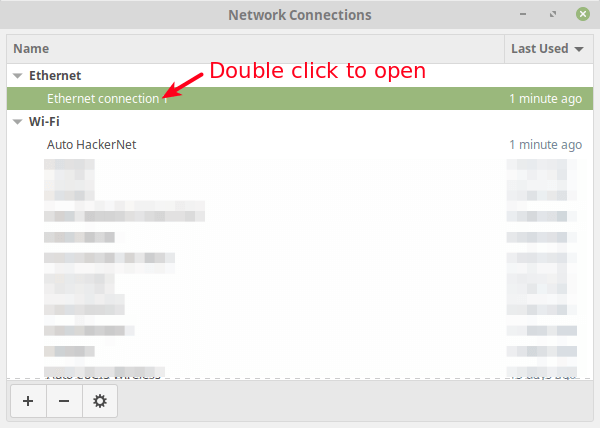
From the pop-up window, select the Wired/Ethernet connection, then go to its settings as described in the following screenshot.

Select Network Connection Interface

Select Network Connection Interface

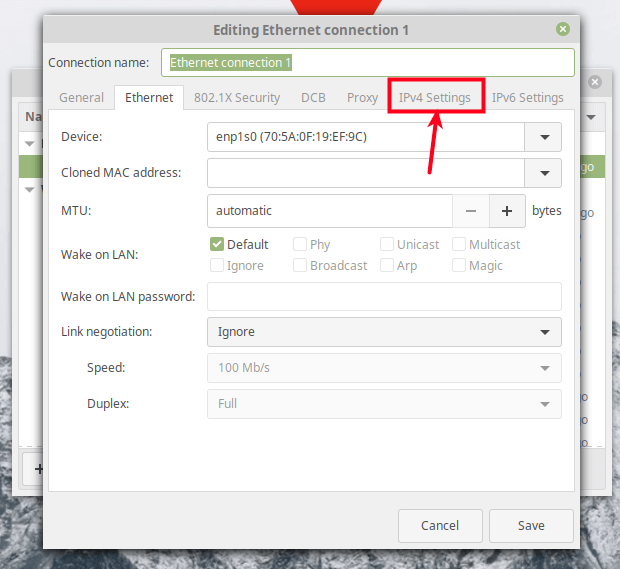
Under the connection settings, go to IPv4 Settings.

Select IPv4 Settings

Select IPv4 Settings

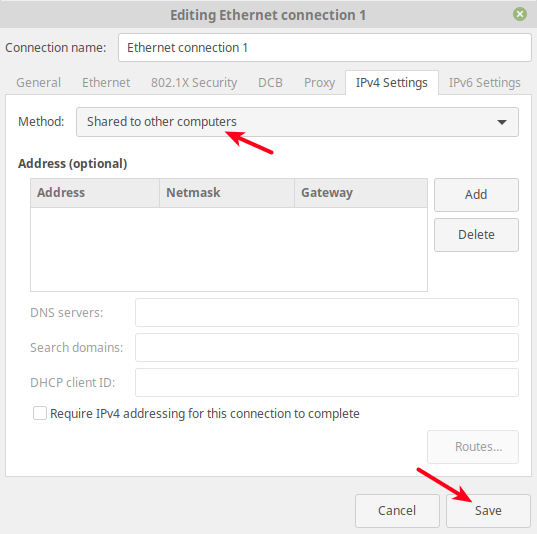
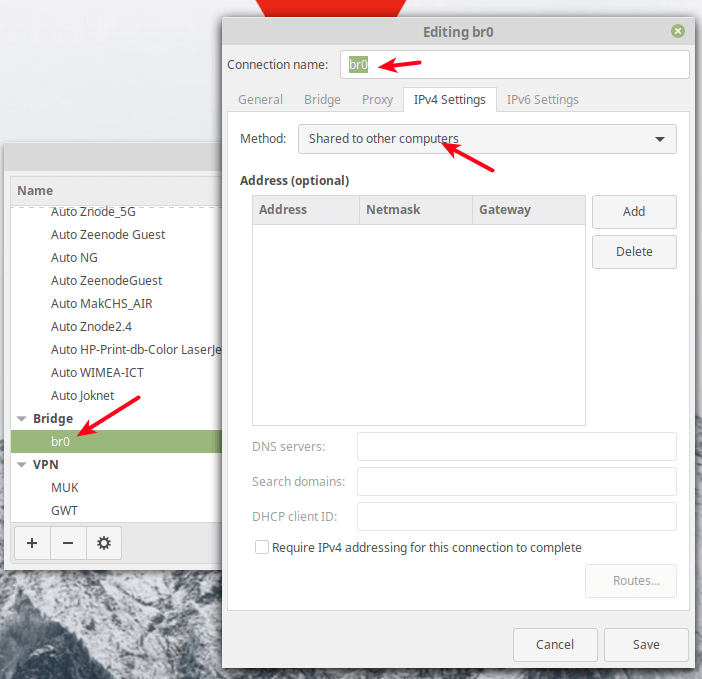
Under the IPv4 settings, set the Method to Shared to other computers as shown in the following screenshot. Optionally, you can add the IP address to define the network to use. Then click Save.

Select Share to Other Computers

Select Share to Other Computers

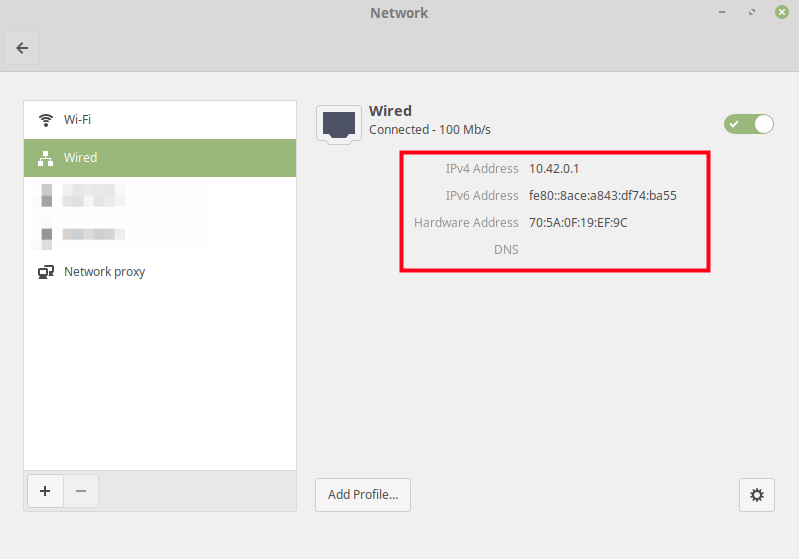
Next, turn the wired connection off then on, to activate it once more. Then open it under Network Connections, it should now be configured for sharing (by having a default IP address of 10.42.0.1) as shown in this screenshot.

Sharing Wired Connection with Other Computers

Sharing Wired Connection with Other Computers

Note: You can also share a bridged interface the same way as the wired interface as shown in the following screenshot.

Share a Bridged Interface with Other Computers

Share a Bridged Interface with Other Computers

Go ahead and connect another computer to the other end of the Ethernet cable or an access point to serve many computers/devices. For any inquiries, reach us via the feedback form below.

Sharing is Caring…
Share on FacebookShare on TwitterShare on LinkedinShare on Reddit

Related

Tags: Networking Tips

How to Setup HAProxy as Load Balancer for Nginx on CentOS 8

Prev Post

How to Create Your Own IPsec VPN Server in Linux

Next Post
Archives
  • January 2023
  • December 2022
  • November 2022
  • October 2022
  • September 2022
  • July 2022
  • June 2022
  • April 2022
  • March 2022
  • February 2022
  • January 2022
  • December 2021
  • November 2021
  • October 2021
  • September 2021
  • August 2021
  • July 2021
  • June 2021
  • May 2021
  • April 2021
  • March 2021
  • February 2021
  • January 2021
  • December 2020
  • November 2020
  • October 2020
  • September 2020
  • August 2020
  • July 2020
  • June 2020
  • May 2020
Categories
  • AlmaLinux
  • Android
  • Ansible
  • Apache
  • Arch Linux
  • AWS
  • Backups
  • Bash Shell
  • Bodhi Linux
  • CentOS
  • CentOS Stream
  • Chef
  • Cloud Software
  • CMS
  • Commandline Tools
  • Control Panels
  • CouchDB
  • Data Recovery Tools
  • Databases
  • Debian
  • Deepin Linux
  • Desktops
  • Development Tools
  • Docker
  • Download Managers
  • Drupal
  • Editors
  • Elementary OS
  • Encryption Tools
  • Fedora
  • Firewalls
  • FreeBSD
  • FTP
  • GIMP
  • Git
  • Hadoop
  • HAProxy
  • Java
  • Jenkins
  • Joomla
  • Kali Linux
  • KDE
  • Kubernetes
  • KVM
  • Laravel
  • Let's Encrypt
  • LFCA
  • Linux Certifications
  • Linux Commands
  • Linux Desktop
  • Linux Distros
  • Linux IDE
  • Linux Mint
  • Linux Talks
  • Lubuntu
  • LXC
  • Mail Server
  • Manjaro
  • MariaDB
  • MongoDB
  • Monitoring Tools
  • MySQL
  • Network
  • Networking Commands
  • NFS
  • Nginx
  • Nodejs
  • NTP
  • Open Source
  • OpenSUSE
  • Oracle Linux
  • Package Managers
  • Pentoo
  • PHP
  • Podman
  • Postfix Mail Server
  • PostgreSQL
  • Python
  • Questions
  • RedHat
  • Redis Server
  • Rocky Linux
  • Security
  • Shell Scripting
  • SQLite
  • SSH
  • Storage
  • Suse
  • Terminals
  • Text Editors
  • Top Tools
  • Torrent Clients
  • Tutorial
  • Ubuntu
  • Udemy Courses
  • Uncategorized
  • VirtualBox
  • Virtualization
  • VMware
  • VPN
  • VSCode Editor
  • Web Browsers
  • Web Design
  • Web Hosting
  • Web Servers
  • Webmin
  • Windows
  • Windows Subsystem
  • WordPress
  • Zabbix
  • Zentyal
  • Zorin OS
Visits
  • 0
  • 254
  • 614,626

DesignLinux.com © All rights reserved

Go to mobile version