When it comes to setting up multiple application servers for redundancy, load balancing is a commonly used mechanism for efficiently distributing incoming service requests or network traffic across a group of back-end servers.
Load balancing has several advantages including increased application availability through redundancy, increased reliability and scalability (more servers can be added in the mix when traffic increases). It also brings about improved application performance and many other benefits.
Recommended Read: The Ultimate Guide to Secure, Harden and Improve Performance of Nginx Web Server
Nginx can be deployed as an efficient HTTP load balancer to distribute incoming network traffic and workload among a group of application servers, in each case returning the response from the selected server to the appropriate client.
The load balancing methods supported by Nginx are:
- round-robin – which distributes requests to the application servers in a round-robin fashion. It is used by default when no method is specified,
- least-connected – assigns the next request to a less busy server(the server with the least number of active connections),
- ip-hash – where a hash function is used to determine what server should be selected for the next request based on the client’s IP address. This method allows for session persistence (tie a client to a particular application server).
Besides, you can use server weights to influence Nginx load balancing algorithms at a more advanced level. Nginx also supports health checks to mark a server as failed (for a configurable amount of time, default is 10 seconds) if its response fails with an error, thus avoids picking that server for subsequent incoming requests for some time.
This practical guide shows how to use Nginx as an HTTP load balancer to distribute incoming client requests between two servers each having an instance of the same application.
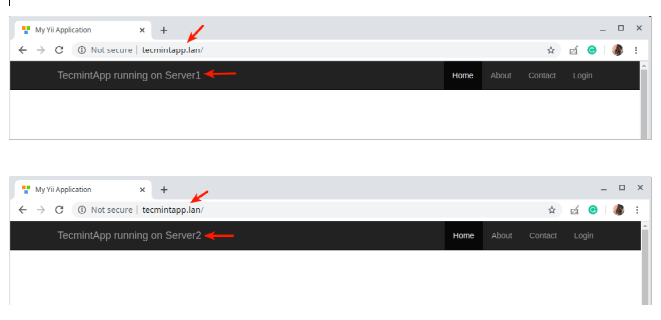
For testing purposes, each application instance is labeled (on the user interface) to indicate the server it is running on.
Testing Environment Setup
Load Balancer: 192.168.58.7
Application server 1: 192.168.58.5
Application server 2: 192.168.58.8
On each application server, each application instance is configured to be accessed using the domain tecmintapp.lan. Assuming this is a fully-registered domain, we would add the following in the DNS settings.
A Record @ 192.168.58.7
This record tells client requests where the domain should direct to, in this case, the load balancer (192.168.58.7). The DNS A records only accept IPv4 values. Alternatively, the /etc/hosts file on the client machines can also be used for testing purposes, with the following entry.
192.168.58.7 tecmintapp.lan
Setting Up Nginx Load Balancing in Linux
Before setting up Nginx load balancing, you must install Nginx on your server using the default package manager for your distribution as shown.
$ sudo apt install nginx   [On Debian/Ubuntu]
$ sudo yum install nginx   [On CentOS/RHEL]
Next, create a server block file called /etc/nginx/conf.d/loadbalancer.conf (give a name of your choice).
$ sudo vi /etc/nginx/conf.d/loadbalancer.conf
Then copy and paste the following configuration into it. This configuration defaults to round-robin as no load balancing method is defined.
upstream backend {
        server 192.168.58.5;
        server 192.168.58.8;
    }

    server {
        listen      80 default_server;
        listen      [::]:80 default_server;
        server_name tecmintapp.lan;

        location / {
	        proxy_redirect      off;
	        proxy_set_header    X-Real-IP $remote_addr;
	        proxy_set_header    X-Forwarded-For $proxy_add_x_forwarded_for;
	        proxy_set_header    Host $http_host;
		proxy_pass http://backend;
	}
}
In the above configuration, the proxy_pass directive (which should be specified inside a location, / in this case) is used to pass a request to the HTTP proxied servers referenced using the word backend, in the upstream directive (used to define a group of servers). Also, the requests will be distributed between the servers using a weighted round-robin balancing mechanism.
To employ the least connection mechanism, use the following configuration
upstream backend {
        least_conn;
        server 192.168.58.5;
        server 192.168.58.8;
    }
And to enable ip_hash session persistence mechanism, use:
upstream backend {
	ip_hash;
        server 192.168.58.5;
        server 192.168.58.8;
    }
You can also influence the load balancing decision using server weights. Using the following configuration, if there are six requests from clients, the application server 192.168.58.5 will be assigned 4 requests and 2 will go 192.168.58.8.
upstream backend {
        server 192.168.58.5	weight=4;
        server 192.168.58.8;
    }
Save the file and exit it. Then ensure the Nginx configuration structure is correct after adding the recent changes, by running the following command.
$ sudo nginx -t
If the configuration is OK, restart and enable the Nginx service to apply the changes.
$ sudo systemctl restart nginx
$ sudo systemctl enable nginx
Testing Nginx Load Balancing in Linux
To test the Nginx load balancing, open a web browser and use the following address to navigate.
http://tecmintapp.lan
Once the website interface loads, take note of the application instance that has loaded. Then continuously refresh the page. At some point, the app should be loaded from the second server indicating load balancing.
You have just learned how to set up Nginx as an HTTP load balancer in Linux. We would like to know your thoughts about this guide, and especially about employing Nginx as a load balancer, via the feedback form below. For more information, see the Nginx documentation about using Nginx as an HTTP load balancer.

